Wednesday, July 31, 2013

Homemade Laundry Soap


I know most of you have probably already made this before but there might be a few of you out there who haven't.  I wish I would have know how to make this when my kids where still living at home.  Laundry soap can be so expensive, especially if you have a large family.
I ran out of Laundry soap today and didn't want to run to the store just for that.  I had all the ingredient's on hand and it takes all of about 5 minutes to make.  It also makes a cute homemade gift. 


Fels-Naptha 1/2 bar
Arm & Hammer washing soda 1/2 cup
Borax 1/2 cup
 
I just made a small batch but you can double the recipe.
 
 
Grate the Fels-Naptha into a bowl.
 
 
Add 1/2 cup Arm & Hammer washing soap and 1/2 cup Borax, stir it all together and put in a cute little jar. 
Add 2 tablespoons to a large load of laundry.  Safe for H E machines also.


Monday, July 29, 2013

How to grow and preserve onions

As you probably have figured out by now, I love to grow a nice sized garden.  It's a great feeling to grow and preserve your own food.  It gives you that feeling of being at least a little self sufficient.  As you also know I highly recommend using chicken manure on your garden.  before we started the chicken farm I would use horse manure and I can tell you from experience it doesn't work even half as good as chicken manure.
I like to plant lots of onions, there are so many ways to use them.  While they are still small I use them as green onions on salads.  As they get bigger they are great to use in stir fry, fajitas, on a pot roast....you get the idea.
 
 
I begin to use the green onions when they get just a little bigger than this photo but you really can use them at this size.  There is a tick to growing onions that I learned from a lady a long time ago.  When your ready for your onions to get bigger you need to keep the soil some what loose around the onions and as they grow start pulling the dirt away from them.  As they grow they will look like they're just sitting on top of the ground and only the roots are in the dirt.

 
I pulled all of the onions a couple of weeks ago and they filled my wheel barrow.  Now what to do with all those onions.
 
 
I used a wire frame that we cover chick brooder boxes and set it on top of the wooden box.  After a couple of days I decided to move them into the shade to dry and set the wire frame up on saw horses.  I think the hot sun was going to cook them, so don't sit them in the sun.  Sitting them on saw horses or whatever else you have, allows air circulation for the green part of the onion to die and dry.
 
 
The green of the onion dries and withers pretty quick.  Allow them to fully dry.
 
 
Once you think the onion tops have dried enough you will trim the tops off with scissors.
 
 
Next trim off the root end.
 
 
Rub off the excess dirt and your done.
 
 
Onion sets are inexpensive to buy, you can plant onions in a small space and with very little work you can have enough onions to last all winter.
To store your onions you can place them in a box but don't stack them deep, really just 2 layers stacked loosely.  Keep in a cool spot.
If you have some good tips, leave us a comment, it might be helpful to other readers.  

Friday, July 26, 2013

One Pot Pasta


Anytime I find a recipe that requires only one pot to prepare, I am willing to give it a try.  This recipe was a hit in our family!  I love it because with the garden season in full swing I can add whatever fresh veggies are around and it will be like a whole new dish.  The basic idea for this came from Martha Stewart's website. I didn't follow it exactly.. so here is my version.

One Pot Pasta

Ingredients:

12 oz uncooked spaghetti noodles  
1-2 cups of cherry or grape tomatoes cut in half
4 cloves of garlic chopped
1 large onion sliced into thin pieces
1 handful of basil rough chopped
3 or 4 TBS of butter
1 tsp of red pepper flakes (this can be changed to taste)
salt and pepper to taste
4 1/2 cups of water

My basil plant.

Get out a large skillet. Lay your spaghetti noodles in the pan. Add your tomatoes, garlic, onion, almost all the basil, butter, red pepper flakes, salt and pepper and lastly add 4 1/2 cups of water.  Place on the stove at medium heat and let the pasta dish cook until almost all of the water has evaporated and the noodles are tender (about 10 or 12 min). Chop the rest of your basil and toss with the pasta before serving.

All of the ingredients ready to cook.

Finished pasta


When the noodles cook the starch makes an almost creamy sauce, you will be so surprised at the wonderful flavor this dish has! If your family is like mine and think meat is necessary with every meal, you could easily slice a grilled chicken breast over the top of this and it would be great.  We think this is really tasty when paired with grilled salmon.  I can't wait until my cherry tomatoes are ripe and zucchini are ready.  It is so fun to cook with things I grow. Hope you enjoy this easy dish!

Try it out and let us know what you think!  Comments make our day!!


Melissa 

Monday, July 22, 2013

Stuffed Green Bell Peppers

 
Well it didn't take long for us to become over run with fresh Green Bell Peppers from the garden so now is the perfect time to make stuffed peppers.  Peppers are so easy to grow even if you don't have a garden, you can grow them in your flower bed or just in a flower pot on the patio.
 
 
INGREDENTS NEEDED
 
1 Pound Ground beef
Green Peppers
1/2 cup uncooked Rice
1/4 cup Onion chopped
1 teaspoon Garlic
1/4 cup chopped celery
1 cup shredded cheddar cheese
2 tablespoons of oil
1 tablespoon Worcestershire Sauce
1 (8ounce) can of tomato sauce
1 can chopped tomatoes (or you can use fresh tomatoes)
 
Preheat oven to 350 degrees.
 
Place rice and 1 cup of water in saucepan, and bring to a boil, reduce heat cover and simmer for 20 minutes.
 
  In a skillet heat oil and add in onion, celery and garlic, sauté until tender. 
 
 
 Add raw ground beef to skillet and cook until evenly browned.  Once the beef is browned transfer into a bowl.
 
Add the cooked rice, can of tomato sauce, chopped tomatoes, Worcestershire sauce and 3/4 cup shredded cheese.  Mix together.   Wash peppers, cut tops off and remove the ribs inside the pepper.  Place peppers in oven proof dish.  Fill peppers with beef mixture and top with more shredded cheese.  Bake for 45 minutes.
 
 
Enjoy!!

If you have something different that you add to your stuffed green peppers, leave us a comment below and share with us all. 


Friday, July 19, 2013

Sun tea +Tomato Worms = Summertime

I'm not sure what the weather has been like where you are, but here in Southern Illinois it is HOT!  Not only is it hot, but the air is so humid that it can be almost unbearable at times.  We are doing our best to stay cool and still enjoy the summer even amid the heat.  I thought it would be fun to share just a little of what our family has been up too.

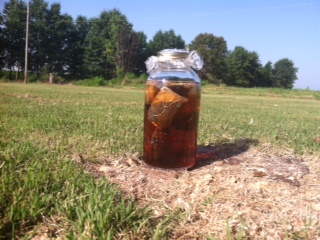
It is HOT and SUNNY... so why not make sun tea.  Have you ever made it before?  We just put jar with water and tea bags out in the yard, then wait for the sun to do its job.  This is the first time making it with the girls. They always have a million questions and comments.  When we made our tea it was no different.  Here are a few...

Ella- "Mom what are we doing?  We don't have a microwave to make tea outside!"

Emma- "Can I smell it?"  This kid smells everything!

Ella- "I think if we don't use the microwave this will take a 100 days."

Ella- "Is this tea going to taste like the sun?  What does the sun taste like?"


Emma used the entire hand method for putting her tea bags in.

Sun Tea!


We have also been battling a great tomato worm.  For a few days I was convinced that a deer was eating my garden.  In the past we have seen deer tracks close to our garden area and each morning such huge portions of my plants were missing that I was convinced there was no way any type of bug or worm could be doing such damage.  On about the third day I decided to take matters into my own hands and make a deer deterrent.  I found some string, a couple post, and some tin cans.  My thought was to hang the tin cans so they would make noise and scare the deer away.  As I was "rigging" my noise maker, I realized that I was looking a giant worm right in the eye.  This was no average worm, this guy was huge!  Ella had been telling me for days that a "giant beast bug" was eating our plants.  I argued that it was a deer and well... she was right, it was a beast of a bug!

Just the day before she had visited my Great Grandpa's house and he was also dealing with tomato worms, he had educated her on how to squish it.  She then passed along his instructions..

Ella- " Grandpa Johnny says that you get it and you squish it with your foot.  But look out!  It will squirt everywhere!  Maybe even your eye!"

I decide to flush our worm down the toilet. I'm not much on squishing things!!

The giant beast!


Noah and I have been trying to plan an overnight getaway since our 9th Anniversary in June.  We finally got it worked into the schedule last week.  After dropping our girls off we headed to Evansville, Indiana.  It was just a short time away spent doing some shopping, eating out as many times as possible, ice skating, and just enjoying childlessness for a little while!


And last but not least our baby girl Eva finally started walking!  I say finally because she was 16 months old before she took her first steps alone.  Eva has been such a content, easy going little girl that she didn't really feel any need to walk.  When we are outside she is always happy to sit and watch the scenery from my lap.  With two silly older sisters entertainment is never far away.  She is enjoying her new sense of freedom and thinks that she is just as big as her sisters now! Here is a short video of her walking skills!


As usual things are busy in our home!  Sometimes I crave downtime, but when it comes I realize even more that we are blessed to have this crazy busy home!

Leave a comment and tell us what you have been up to on these sweltering days.  We LOVE to hear from you!

Melissa

Wednesday, July 17, 2013

LET'S TAKE A WALK TROUGH THE GARDEN


I love gardening and each year we always plant a bigger garden than the two of us could possibly ever need.  We raised 3 kids and it was a necessity to plant a big enough garden to preserve enough fresh vegetables to last the winter.  I was a stay at home mom and we lived on one income and the budget was tight.  It really helped out a great deal to have the corn in the freezer and green beans in the jars sitting on the self not to mention how much better it tastes. Now the kids are all grown up and I'm still planting a garden big enough to feed our small town. 
If you look closely in this photo you can see proof  that chicken manure really works great.  The corn planted closest to the chicken pen is about 1 foot taller than the other end of the row.  We do spread a lot of chicken manure on the garden but apparently it could use even more.

 
We've planted the garden twice this year as you can see the first time was a total wash out, it rained so hard it cut ditches. 
 
 
I can't help but check the plants each day just waiting on that first ripe tomato, or that first crisp cucumber.  Within about a week we'll have more green peppers than we can possibly ever eat.

 
Looks like we'll have a few watermelons this year.  This baby watermelon is only about 4 inches long, the picture makes it look much bigger than it actually is.
 
 
Roma tomatoes make the best tomato juice of all.


Cucumber blossoms. 
Join us in the weeks to come as we begin to harvest and prepare some great fresh vegetables.

Monday, July 15, 2013

A Quick Temporary Fix for Flat Tiller Tires

We always plant a rather good sized garden each year and when doing that you need a tiller you can rely on.  Every year it seems Larry struggles with flat tires on the tiller so this year he decided he was going to make a plan to fix this problem.  My sister in-laws will understand when I say, if there's a chance this McEwen man can fix it on his own he will never buy new ones and never let anyone else fix it for him.
Larry said " Hun get your camera we're going to teach folks how to fix a flat tiller tire."  I'm thinking most folks probably just go get them fixed Hun.  So here we go.   

 
TOOLS NEEDED
Drill
Drill bit size 3/8
Turkey baster (from wife's kitchen) 
1 can of spray foam insulation
2 flat tires :) 
 
 
Begin by drilling 7 holes along the wall of the tire.
 
 
Fill your turkey baster with about 2 tablespoons of water and squirt the water into one hole in the tire that you have drilled.  The spray in foam needs the water in order to cure.
(next by a new turkey baster for the kitchen)


Now your ready to use the foam insulation, who knew it had so many uses
 
Insert straw into the holes you drilled and spray foam for 3 seconds in each hole.
 
 
Now your tire is full of foam.
 
 
As it begins to sit and cure it will continue to expand and bulge out of the holes.  very interesting!
 
 
Let the tire sit and cure 1 day.
 
 
The next day, pull the ugly bulges off of the tire, you might also need to cut them off.  I see he has also stolen my butcher knife from the kitchen.
 
 
To finish them up you can use a piece of sand paper to sand off the remaining foam.  You are now ready to put your tires back on the tiller and get after those weeds.
Hope you have a productive gardening season.
Angie & Larry

Friday, July 12, 2013

Our Chickens Are Growing!


I thought that everyone might like to see an update on our growing chicks.  All six of them are still growing and doing great!  They don't really look like chicks anymore, they have lots of feathers and are just about to get through the awkward feather and fluff stage.

Not only are the chicks growing, they are getting quite adventurous too.  They love to "play" in our yard.  When we put them out they follow us around, and never get too far from our feet.  As you can see in the video below when one finds something interesting all of them flock to the same place to check it out.  Such curious little chickens!


On to the pictures... my how they have changed!

This is our Olive Egger named Early or as my husband calls he/she  Earl Lee.  It was the first chicken to hatch and a family favorite.


Meet Copper our Welsummer.

Sunny is a Jubilee Orpington.

This is Tiny he is our Chocolate Orpington.  From the beginning it has been the smallest and has the fewest feathers.  Guess it is a late bloomer.
Sunshine is a Coronation Sussex.  I love how this chicken waddles!
Henny Penny our cute Americana.  I love its fluffy cheeks!!!
We are definitely enjoying raising our chickens!  Leave us a comment and tell us about yours!

Have a great weekend!

Melissa

Tuesday, July 9, 2013

Chicken Farm Water System - Homemade Poultry Water System

Here at the Chicken Scratch Poultry farm nothing goes to waste we re purpose and reuse everything.  We're not fancy and we work with junk, just like I'm pretty sure most of you folks also do.  If we can't make it ourselves then a lot of times we just don't need it.  My husband is a very handy man and I think he can do anything he puts his mind to, with a little help from his brilliant wife, hee hee.  It's amazing how different a man and a woman's brain works.  When we put our minds together we can come up with some pretty great things.
When we first started the poultry farm the biggest part of the chores each day was cleaning and filling all the waterers.  It seemed the waterers were always full of gunk and muck, it was just to much to deal with.  The bigger the farm grew the bigger the water burden.  Not to mention in the winter the water was always froze and that was a huge problem.  We put our minds together and started thinking.  Low and behold if it wasn't my brilliant mind that came up with the solution.  I said honey running water won't freeze correct, he thought that was correct.  So we came up with an idea.  We actually supply water three different ways depending on what time of the year it is.
During the spring months when we're getting frequent rain showers we have a very small creek that runs down the middle of our farm right between the two barns.
 
We take two Goldfish pond pumps one for each barn, connected to garden hoses and the water is pumped from the creek to each barn.  Inside of each barn is PVC pipe that runs through each chicken pen. The pipe has holes cut out for drinking.   The end of the pipe that the water begins on needs to be higher as it snakes through the barn and it needs to have a gradual down grade so that the water flows.  After it flows all the way around the barn and through each pen it then empties back into the creek.  The water has a constant flow.   When the water is no longer deep enough in the creek to pump water, which is usually late June we switch to another method. 

 
Back behind our barns we have a pond once the weather turns hot start using this water source.  The pond sits higher than our barns so we can use gravity to get the water to the barns and no longer have the need for the pond pumps.  We run a garden hose to each barn from the pond and stick it down in the PVC pipe and the chickens have constant fresh running water again.   In the very hot summer they have cool water sucked off the bottom of the pond.   The system is not perfect we do have the occasional clog up and it needs to be checked daily for possible clogs.   If a clog up happens and we aren't on top of it we can have a lot of water in the barn pretty quick.  We do have an egg ever so often make it into the pipe, by the way hens how does this happen?

 
The picture on the right shows how the water begins the flow.  The garden hose is just pushed down into the PVC pipe.   Holes are cut in the PVC pipe, just big enough to get a drink and apparently just big enough for an egg.  The water only trickles down the pipe, it's not a great deal of water, especially when we are syphoning from the pond.  As long as we get normal rain fall we never notice the pond level getting any lower.
During the summer months we also run the water through the grow out pens for the young pullets.  This is disconnected during the winter months and no birds are kept out here
.

During the winter months we need to do things a bit different.  The first year we used this system we found that running water will freeze.  When the water freezes up and you have 300 or so chickens without water you've got trouble!!  Once again we switch to another method.  We use a large stock tank filled  with water and a stock tank heater to keep the water warm enough to make it all the way through both barns and back into the tank without freezing.  This is where we start using the Goldfish pond pumps again.  The water tank is emptied each night and refilled with fresh water. 
It's amazing how the chickens will notice instantly if we turn the water off  and it's like they are dying of thirst.  We turn it back on 5 minutes later and they drink like crazy, they are so funny.

 
When we administer wormer it's easily done with the stock tank and pumped through the barns, give them enough time that they have all had a drink and it's as easy as that.
Hope this was helpful, it works well for us. 

Angie