Tuesday, November 26, 2013

Spinach Salad - Great Addition To The Thanksgiving Meal


Would you like to take something to the Thanksgiving gathering this year that will have them asking for your recipe?  I know it's just a salad but you won't be sorry you made it.  You'll have them coming back for seconds.  It's very easy to make and you probably have all the ingredients in the pantry.


IGREDIENTS
 
1 bag of Spinach( or two bags depending on how many your feeding)
5 strips of bacon
Green onion
Croutons
Sunflower seeds
Parmesan Cheese
Salt
Ground dry Mustard
Sugar
Oil
Vinegar
 
Begin by cooking your bacon nice and crispy and you can put in as much as you like.  Set aside to cool.  Hard boil 3 or 4 eggs and set aside to cool.  Now lets make the dressing.  I make up the dressing in a mason jar and don't put this on the salad until your ready to eat.
 
DRESSING
 
1 Cup Vegetable oil
1/2 cup sugar or sugar substitute
4 Tablespoon vinegar ( I used red wine vinegar)
2 Tablespoons green onion
1 Teaspoon salt
1/2 Teaspoon ground mustard
  Mix until dissolved
 
 
Place your spinach in a pretty bowl, top with bacon, hard boiled eggs, parmesan cheese, croutons, Sunflower seeds and anything else you might like.  When your almost ready to eat the meal, pour your dressing on the salad and toss. 
 
We hope you have a wonderful Thanksgiving!
The Chicken Scratch Poultry Girls
Angie & Melissa
 
Psalm 107:1
Give thanks to the LORD, for he is good; his love endures forever.


Friday, November 22, 2013

Winner of the Brinsea Ova Scope and Hatching Egg!


THE LUCKY WINNER IS.......


STEPHANIE BURNS
 

Congratulations Stephanie!!  Your the winner of the Brinsea Ova Scope and a box of assorted hatching eggs form Chicken Scratch Poultry.   Please contact me at larry_angie@chickenscratchpoultry.com for shipping information.
 
Thanks to all who participated we appreciate you all so much!
 
Head over to Brinsea and make your Christmas wish list and tell them Thanks for their generous giveaway.
 
Have a Great Weekend!
From the Chicken Scratch Poultry Gals
Angie & Melissa


Thursday, November 21, 2013

Brinsea Ova Scope - Giveaway

BRINSEA OVA SCOPE GIVEAWAY

You still have time to enter the drawing for the Brinsea Ova Scope,  along with that product Chicken Scratch Poultry will also be sending the winner an assortment of hatching eggs.   We will be choosing the lucky winner tomorrow November 22, don't forget to check in and see who the winner is.

The Brinsea Ova Scope is a candling devise to use while incubating eggs, (this is not an incubator).  With the Ova Scope you can watch your live embryos develop inside the egg.  This aid to egg candling improves the clarity and visibility of the egg and its contents by completely blocking out ambient light. It slightly magnifies the image of the egg and allows you to rotate the egg smoothly as it is observed.

It's time to make that Christmas wish list so head over to Brinsea and check out all the great products they have to offer. 
They have something for all of your poultry needs.

Steps To Enter The Drawing

1. Like the Chicken Scratch Poultry Facebook page
2. Like the Brinsea Facebook page.
3.  Your name needs to be in our followers list. To become a follower click the blue button on the right that says "join this site".   
4.  Leave us a comment as to why you would like to win the Ova Scope and box of hatching eggs. 
Good luck!!

Monday, November 18, 2013

Brinsea Ova Scope - Free Giveaway!

The great folks over at Brinsea are offering the Ova Scope to one lucky winner this week.  Along with that, The Chicken Scratch Poultry Farm will be sending that same winner an assortment of hatching eggs. 
With the Ova Scope you can watch your live embryos develop inside the egg.  This aid to egg candling improves the clarity and visibility of the egg and its contents by completely blocking out ambient light. It slightly magnifies the image of the egg and allows you to rotate the egg smoothly as it is observed.
This is a very generous offer from Brinsea and we are so excited!  Head over to Brinsea and check out all of the neat items they offer for all your hatching needs. 
If you sign up to win the Ova Scope, your also getting a box of hatching eggs, so you'll need an incubator....  The Brinsea Mini Incubator does a wonderful job!
The winner will be announced on November 22.

 STEPS TO ENTER THE GIVEAWAY
1. Like the Chicken Scratch Poultry Facebook page
2. Like the Brinsea Facebook page.
3.  Your name needs to be in our followers list. To become a follower click the blue button on the right that says "join this site".   
4.  Leave us a comment as to why you would like to win the Ova Scope and box of hatching eggs. 
Good luck!!


Friday, November 15, 2013

Heavenly Cinnamon Rolls Recipe: With Melissa

If you read often you are probably beginning to see that I am developing a love for baking.  I do not enjoy baking cookies so much as I like baking breads and rolls.  I love the fact that I can make breads and rolls at any time since they require simple ingredients that I always keep on hand.  Yeast, flour, sugar, salt and you have the basics for almost any type of baked good.

Early in the week my grandparents, parents, and sister all came out for dinner.  I had been needing an excuse to make some cinnamon rolls and I decided that their presence was the perfect one.  I have made cinnamon rolls a few times before, using a recipe that came with my mixer, but I always felt they were not quite right.  Good but not fantastic.  After looking through several recipes I used this one but made a couple changes.

If you think that making cinnamon rolls seems intimidating I know the feeling.  If I can put these together and have them turn out great, then so can you!

You will need:

Dough
4-5 cups flour
2 TBS yeast
1 1/4 cup of milk
2TBS oil
1/2 cup sugar
1/2 cup butter
1 tsp salt
1 egg

Filling
1/2 cup butter
1 1/2 cup brown sugar
2 tsp cinnmon ( Just add however much you like.)
1 TBS flour

Glaze
1 1/2 cup of powder sugar
1 tsp vanilla
1 TBS butter
1-3 TBS hot water

First we will make our dough.  In a sauce pan over low heat mix the milk, butter, oil and sugar together.  Heat until warm about 120-140 degrees.  In your mixing bowl place 2 cups of flour, yeast and salt.  Stir together so the ingredients are combined.  After your liquid is warm pour it into the mixing bowl with the dry ingredients while the mixer is running on low.  Then add the egg and mix until smooth.  Once smooth, continue to add flour until you have a soft dough.  I had to add about 2 1/2 more cups of flour to achieve this.  Cover the dough and let it rise for 45 minutes.


Warming the milk, butter, oil, sugar.


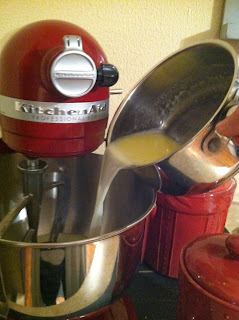
Add the warm liquid to the dry ingredients.


After the dough has risen, flour your work surface well and roll it out into a large rectangle.  I tried to get mine rolled out to about a 1/4 inch thick.  You are ready for your filling now.  Melt the butter, mix in the brown sugar, cinnamon and flour.  Spread it evenly over the rolled out dough.  I found it easiest to you use my clean hands to do this.  Now start at a long edge of the dough and begin rolling it as tightly as you can.  Work slowly and evenly and it should come together pretty easily.  Now slice your rolls off and place them in a greased baking dish.  I sliced my rolls off a little over an inch thick and got a dozen.  Place in a 375 degree oven for about 20 minutes.  Enjoy as your house smells heavenly!

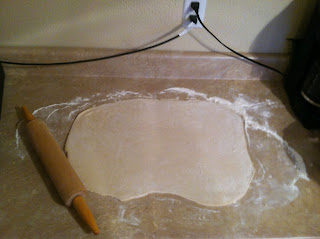
I have the hardest time making a good rectangle.

Topped with filling.

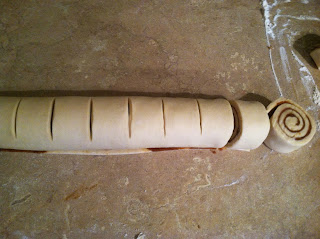
Sliced and ready to bake.


 To make the glaze melt the butter, add the vanilla and powder sugar. Mix together and then start adding little amounts of hot water until you have the consistency you like.  After the rolls are baked allow them to cool for about 5 minutes and then top them with the glaze.


My family thought these rolls were fantastic!  I made the dough again last night and then rolled them out baking them this morning for breakfast.  My husband said they were the best cinnamon rolls he has ever had.  That is quite a compliment coming from him, he is very honest and not a sweets lover.  My middle girl Emma said, "Momma you are the best cinnamon roll cooker ever!"  I really enjoy baking and it is it even more fun when my family appreciates it too!

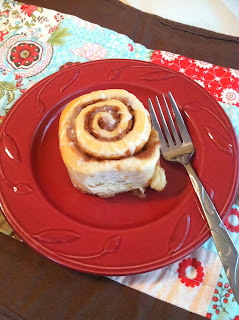
It taste heavenly!!!

Add these to your list of recipes to try and let us know when you do!

Melissa

Tuesday, November 12, 2013

Bartering With Poultry

Over the years while answering emails from all of you chicken folks out there in chicken land, I started noticing your email address or business names that you email me from.  I often notice if you operate your own business or if you sell something I might be interested in.  Like I've told you so many times before, we meet some very nice and interesting people in this business. While talking to people on the phone they often tell me about the businesses they operate and I begin to inquire as to what they do or what they sell.  If I am interested in their product, sometimes I ask if they would be interested in bartering for their poultry.  Usually people are a little taken back by the question but then thrilled with trading their product for ours.  Sure it's nice to be paid for our poultry but it's even more fun to try out someone else's product.  This past year I've bartered 4 times, we received some great products and I hope to do more in the future.
Here's a look at some of things we bartered for.  The person trading always received either chicks or young pullets from us.


My first experience with bartering took place when a gentleman sent me an email inquiring about young pullets, and I noticed at the bottom of his email it said Boom Brothers Coffee.  When I answered his email about the pullets I asked if he sold coffee, he said "Well yes I do why don't you check out my website".  So that's what I did.  He has some very neat names for his coffee.  Since his last name is Boom he uses that name in all his coffee varieties. Some of my favorites so far are Sonic Boom, Boom Blend, Badda Boom Badda Bing, Lower the Boom, Ka Boom and my all time favorite is the Velvet Hammer! 
I asked him if he would be interested in trading coffee for pullets, he said that sounded good to him, so that's what we did.  We have now traded coffee for birds twice with Mr. Boom and I'll tell you it's some of the best coffee I've ever had!  If you like coffee and enjoy trying new flavors and blends you will not be disappointed with Boom Brothers Coffee.  Check out his Coffee store at http://boombros.com/  make sure you order something, it makes a great Christmas gift!


A Gentleman called this past spring wanting to order Rumpless Araucana chicks for his wife.  We talked for awhile and he asked where we are located.  I told him Illinois and he said that he was from Arkansas and that he comes to our area every year for a craft fair.  I asked him what kind of craft he produced and he told me about is beautiful rolling pins, pasta cutters, biscuit cutters, kids tops and much more.  Once again I threw out the prospect of doing some trading.  He thought that sounded like a great idea.  I told him what I'd like to have, he sent me a box full of beautiful hand made items and in return I sent him a box of chirping chicks.  The man that makes these items does not have a website but I'm sure he would love your business, his name is Leon Hoffman and his phone number is 870-496-2559.  He will take orders and mail them out to you.  Leon does very nice work and I'm very happy with everything he sent me. 


I've bartered twice now with our great friends Judy and Steve Webb.  Steve is a life long beef and grain farmer.  He grows some of the best beef cattle around our area.  If any of you locals ever want to order a beef to put in the freezer, give him a call he'll set you up.  Steve likes to have a new flock of laying hens each year to insure he has fresh bacon and eggs each morning so we're happy to share.  We are especially happy to help when Judy comes bartering with beef roasts.  Just joking with you about the hens Steve, I know there Judy's hobby flock and we thank you for the delicious beef!

Bartering is fun, give it a try sometime.  I think I'm on the look out for some fresh harvested honey...
Leave us a comment, tell us about your bartering experiences.
Have a Blessed day!
Angie 

Friday, November 8, 2013

Crusty Artisan Bread with Melissa

Most of the time I really love living in a rural area.  Now when I say rural I mean we live about 15 miles from the closest grocery store or Wal-Mart.  I am very aware of the fact that many people and some of you readers out there may be living in more rural areas than us.  I guess one would call that living in the wilderness.  There are however (in my opinion) some draw backs to living in rural Southern Illinois.  Sometimes I would really love to run to cute little shops and restaurant's on a whim.  When we are on trips or just out in larger cities I enjoy seeking out bakeries.  My sister lives near Seattle and there the bakeries are plentiful.  When I visited her back in March I did my best to take in as much bakery delight as I could!  Since I do not live where quaint bakeries are often found I must fulfill my need for tasty baked goods by baking them myself.

Since my mother-in-law gave me a Kitchen Aide mixer a couple of years ago, I often experiment with making different breads.  In the cooler fall and winter months I make bread or rolls a few times a week.  I decided that since the weather is cooling off you all might be in the bread making mood and enjoy a new and very simple bread recipe to use wherever you are.

What will you need?

1 1/2 cups warm water
1 TBS of yeast
1 3/4 tsp of salt
3 cups flour + flour for kneading and preparing your work surface
Cast iron Dutch oven.


Lets make bread!

First put your warm water in your mixing bowl (I used my stand mixer but you could do this in a large bowl), then add yeast and let it dissolve for about 5 minutes.  After your yeast dissolves add 1 cup of flour and your salt, begin mixing the dough on a low speed.  Gently add in the rest of your flour until it is all mixed in and the dough looks pretty sticky.  Now cover the dough and let it sit at room temp for about 8 - 12 hours.  I will be honest and say there are many times that I rush my dough and do not let it set for this long.  The bread does have a nicer texture if it sets for 8-12 hours but still taste great if you rush it like me. 


This is the dough after it set for about 10 hours.

After the dough has sat, flour your hands and your work surface very well, then dump the dough out of the bowl.  The dough is going to be STICKY!  Gently knead in probably another 1/2 cup of flour, the dough will still seem like it won't hold it's shape and that is okay.

Just waiting to be baked!


  Now pre heat your oven to 400 degrees and place your greased Dutch oven in the oven to get it hot.  While your oven and pan are pre heating just let the already kneaded dough sit on the counter and rest.  When the oven and pan are ready pull hot pan out and scoop up your dough and place it in the Dutch oven and cover it with a lid.  Bake the bread covered for about 30 minutes and then take the lid off and bake for another 12-15 minutes or until it looks the color you like.  (If you have no Dutch oven pan then you could bake the bread on a baking sheet and place a pan of hot water beneath it in the oven while it bakes.  This helps achieve the crusty outside you get from baking in the Dutch oven.)
 So crusty!
I just took the bread out of the oven and took pictures of it, so it was too hot to slice.


I love this bread because it has a very crusty and tough outside, but the inside is perfectly soft!  It is perfect with any soup or it is great sliced thin and toasted in the morning.  Who needs quaint bakeries when you can make great bread yourself!?!?

I really hope that you enjoy this and maybe have a chance to try it out this weekend.  Leave us a comment and let us know if you do give it a try or if you have any bread making advice.  We LOVE hearing from our readers!
.
Melissa


Monday, November 4, 2013

Moving A 24 Ft. Building - The Farm Is A Constant Work In Progress

Last week our neighbor listed a building for sale on Face Book and I happened to see her listing and inquired about it.  It is a 10 x 24 ft. nice sized building and she had it priced very reasonably.  She had used the shed for quite a few years to raise her Yorkie puppies in and it served the purpose well but she had stopped raising puppies and no longer needed this building.  It is
equipped with cages, sink, air-conditioning, and heat.  Really it's a little fancy for raising chickens in but we couldn't pass it up.


Larry called a local business that builds sheds and asked them if they would happen to be able to move it for us and the young kid that answered the phone said sure no problem.  He assured us he could pick it up, move it, sit it anywhere we wanted and level it.  So the race was on to beat the rain and get it moved.
I must say we were a little skeptical when a young kid that looked like he couldn't be over 20 years old showed up by himself with a 20 Ft. trailer to pick up a 24Ft building.  Although within just a couple of minutes of watching him work our minds were put at ease and this young man knew exactly what he was doing.


He had no trouble loading the building at the neighbors house and then once he got to our farm with it he had no trouble backing the trailer and building into a very tight spot we had picked out. 
 
 
It was really pretty amazing to watch as he placed the building right in the spot we needed.  He operated the trailer with a hand held remote and was able to unload, and level the building without ever getting back into the truck and did it all by remote.


Leveling the building went quickly.  The whole process from picking up the building, moving it down the road and sitting on our farm took all of about 1 hour or less.  Now the real work begins, hooking it to power and water, I bet that won't go so quickly, sounds like a project for spring.
We hope to use the building for young pullets.  When customers place a pullet order, the young birds are caught up on a Saturday to get ready for a Monday shipment.  It takes a lot of cage space for all the birds.  We are hoping this will make that process go even more smoothly. 
 
Hope you enjoyed a peek into the farm happenings.
Have a Great Day!
Angie 

Saturday, November 2, 2013

Enjoying Fall with Melissa

I have a hard time choosing my favorite season.  More than having one favorite, I tend to enjoy the change that comes with each new season.  Within the last couple of weeks the weather in Southern Illinois has definitely started to feel like fall.  We have officially changed our closets over to warmer clothes and put all of our jackets out for easy access.  Harvest has been in full swing on the family farm and as of this week the guys have almost finished.  There is a feeling of relief and excitement that comes with the last acres being harvested!

Trying to get the last couple acres of bean cut before the rain.

 Since Daddy's work slowed a bit and rain moved in he got to participate in taking the girls Trick-or-Treating.  Halloween is not my favorite holiday and I have some mixed feelings about it, but we do let the girls dress up in non-scary customs and go visit a few friends and family.  I love to make my girls costumes and this year I let the older two girls pick what they wanted to be.  Ella loves all things princess.  I was not surprised when she wanted to dress-up like Cinderella.  Emma decided to be a purple lady bug.  When she first told me of her plans I tried to explain that lady bugs are red so she would be a red lady bug.  Then I thought, "She is three years old.  If she would like to be a purple lady bug then she can be!"  So a purple lady bug she was!  Our littlest girl Eva wore a butterfly costume that had been passed down from big sister.  I was able to get fabric and felt to make the big girls costumes on sale so it was very cost effective, and the girls loved the fact that I made them.  I know that someday they will probably decide that they prefer store bought things instead of what I make, so I am enjoying making things for them while I can.

Our family.

Emma the purple lady bug.

Cinder-Ella!

Our little butterfly.
Our family is always changing, much like the seasons and we are trying make sure we are taking it all in.  I hope that your fall has been a blessed one so far.  Leave us a comment and let us know how you have been enjoying fall.  Your comments make our day!!

Melissa