

Monday, April 15, 2013
And the winner is...
Henny Penny
Back in February two of our Light Sussex hens became broodie and I decided to give them a job of hatching eggs. We took the two hens and moved them into a pen of their own and and gave each of them their own box to sit in. When we gave them their eggs they seemed quite happy and settled right into the nest. Two days later one hen decided to get in the box with the other and share her eggs. So the eggs she was sitting on became cold and nonviable. I removed one hen and left Henny Penny to her job. I learned a few things myself through this little project. Never put 2 hens together when hatching and don't set them in a drafty box hanging on the wall in February to hatch eggs, they will never keep the eggs warm enough.

Twenty one days later I checked under her and saw that the eggs had begun to hatch, I then at that time moved her to the ground so that the chicks would not fall out of the nesting box hanging on the wall. I made her a nice bed of straw and she hatched out 3 cute little chicks. At the end of this post make sure you take time to watch the video of Henny Penny and her sweet babies!

Henny Penny was as proud as punch with her new babies. I could sit and watch her for hours as she talked and purred to her babies but it was February and a bit too cold to sit and watch chicks.

The young hen was a great mother even though it was her first chicks. Every time I came into the barn to visit her she would put them in the corner and get between me and the chicks. It was difficult to even get a good picture of them.

Once the chicks were fully feathered I decided it was time for their first outing so I opened the door and waited. Henny Penny peeked out to survey the situation.

She checked the chicken run to make sure it was safe for the babies to come out. The chicks waited and watched. Is that not the cutest little head peeking out the door!

After she was satisfied that it was safe she went back to the door and encouraged the chicks to come on out. The sounds she made to them was so sweet! I wish I had videoed this moment!

It took some convincing, but she finally got the little Sussex baby to follow her. She paraded that chick all over the chicken yard. Henny Penny raised the chicks for 6 weeks, just this week she decided she had raised them long enough and wanted to get back to her flock mates. I tried to ignore her and leave her with the babies, but one evening she jumped the fence and headed for her flock. I guess she knows best. She taught them well, they know how to roost when other chicks their age can not, she also taught them to go out side to the automatic water instead of drinking from the chick waterer. There is nothing more fun than watching a hen raise babies.
Have you every pondered that age old question, which came first the chicken or the egg? In Genesis 1:21 it reads God created every winged bird according to its kind and God saw that it was good.
Friday, April 12, 2013
Naptime Stitches
In September of 2009 my husband accepted a full time Pastoring position in a church that was about an hour from where we were living at the time. Taking this step into full-time ministry meant a move for us and it was the perfect time for me to transition into the stay-at-home-mom role. At first I embraced the fact that everyday resembled the one before it. I loved getting up, playing with Ella, and getting to housework whenever I felt like it. It was nice to cook every day, and my husband loved it too! To be honest I’m not really sure what I did with all my time, after adding two more little girls I’m thinking I wasn't very efficient!

About 4 months passed and we found out we were expecting our second baby. Morning sickness and the pregnancy hormones took hold and I started to become less than content with the day to day. At this point I hadn't made too many friends and was feeling quite lonely. I was only an hour away from my family, but still felt distant. There was always plenty to do, but it was the same thing I did yesterday, and tomorrow it would need to be done again. (You know the things… making the bed, sweeping the floor, dishes ect.) It was in those days that I began to search for a hobby, something that stayed finished once I completed the task.
December rolled around and my Mom began asking what I would like for Christmas. After a little thinking I told her a sewing machine. I had been looking at craft and sewing blogs and it seemed as if sewing could be the perfect hobby for me. Creating things had always been something that I loved! After Christmas I couldn't wait to begin my sewing adventures. After reading endless sewing blogs and finding a mountain of projects I wanted to try I was a little overwhelmed. My sewing machine set untouched for a few weeks. Finally a friend and I got together, and she helped me to complete a simple log cabin quilt. It was just the push I needed! After that I just took off, if I was unsure of how to do something I just googled it. There are so many helpful blogs and resources out there. I'll share some of my favorites in another post.
After our second daughter Emma was born my sewing time diminished greatly. As we got into a routine I realized that if there was going to be sewing time both girls had to be on the same nap schedule. Once that was achieved my daily sewing session took place at about 2:00. It felt so good to put down all the house work and do something creative even if it was for only a short time.

My love for sewing started with quilting. It is so fun to see how the quilt is transformed after it’s all finished. My little girls love clothes and dresses, so naturally I started sewing things for them. I am not a fan of using store bought patterns, so I usually draw out my own and just start sewing. It is always an adventure. When I made their Easter dresses the first one was intended for my oldest daughter, however when finished the dress was too small, but fit our middle girl Emma perfectly! She loved it and I learned a thing or two about pattern sizing along the way. The girls love to wear the things that I make for them and that brings me
such joy!

Sewing for other people is also something that I enjoy. Recently I have been making items and putting them on my Naptime Stitches Boutique Facebook page. A few of my latest orders have been little girl’s dresses, baby quilts, purses ect. There is great satisfaction in seeing someone else love what I make!
The pictures scattered throughout this post are some of my completed projects. Just yesterday I put together a couple of new pillows that I thought all of the Chicken Scratch followers would enjoy. You can find and order them over at Naptime Stitches Boutique. (there is a button at the top of the blog page) If you comment with your name, email and tell us about your hobby you will be in for a drawing. The lucky winner will get to choose between the Rooster or Egg pillow.
Well it is naptime so that means that I better get stitching!
God Bless!
Melissa
**Don’t forget to comment to be put in the drawing!
Wednesday, April 10, 2013
EGG SHIPPING DAY

Every Monday and Wednesday is shipping time for our hatching eggs. You might think why only Monday and Wednesday. We like our hatching eggs to show up as fresh as possible to our customers. If you ship to late in the week they have a chance of sitting at your Post Office on a Sunday and not in your incubator.

Hatching eggs are gathered one evening and one morning and then shipped. We don't like to hold eggs back any longer than that which is another way to insure you get a good hatch. When the hatching eggs are gathered they are not always clean and in the greatest condition, so the first step when filling an order, before I begin to pack their eggs they will need to be cleaned up. A dirty egg will not hatch. I want my customers to have the best chance possible of having a good hatch rate. Eggs are gently cleaned, it will not hurt to wash a hatching egg with a damp cloth.

We hatch many, many eggs every week and after doing this for so long you begin to notice what eggs don't hatch and which ones have a better chance of hatching just by looking at them. An egg with a rough shell, off color, or odd shaped will not hatch. There are also some other characteristics that I see that will not hatch but I just don't even know how to describe them. When shipping hatching eggs I ship the best of the best.

I use eggs cartons that I cut down to size. I can safely fit 16 eggs in a box and no more. Once the eggs are cleaned I put them into the carton pointed end down. I will either label the egg or the carton as to what breed I have packed. Eggs can be labeled with a pencil not a marker. Each eggs is wrapped in a napkin so they can not move in the carton. I never wrap an egg in bubble wrap and do not recommend it.

Once the carton is filled, more napkins are added to the top of the eggs for padding and to insure no movement in the carton. The carton is then closed and taped shut.

Each box gets about 4 inches of crumpled newspaper or shredded paper in the bottom for padding. Egg cartons are turned on their sides and put into the box.
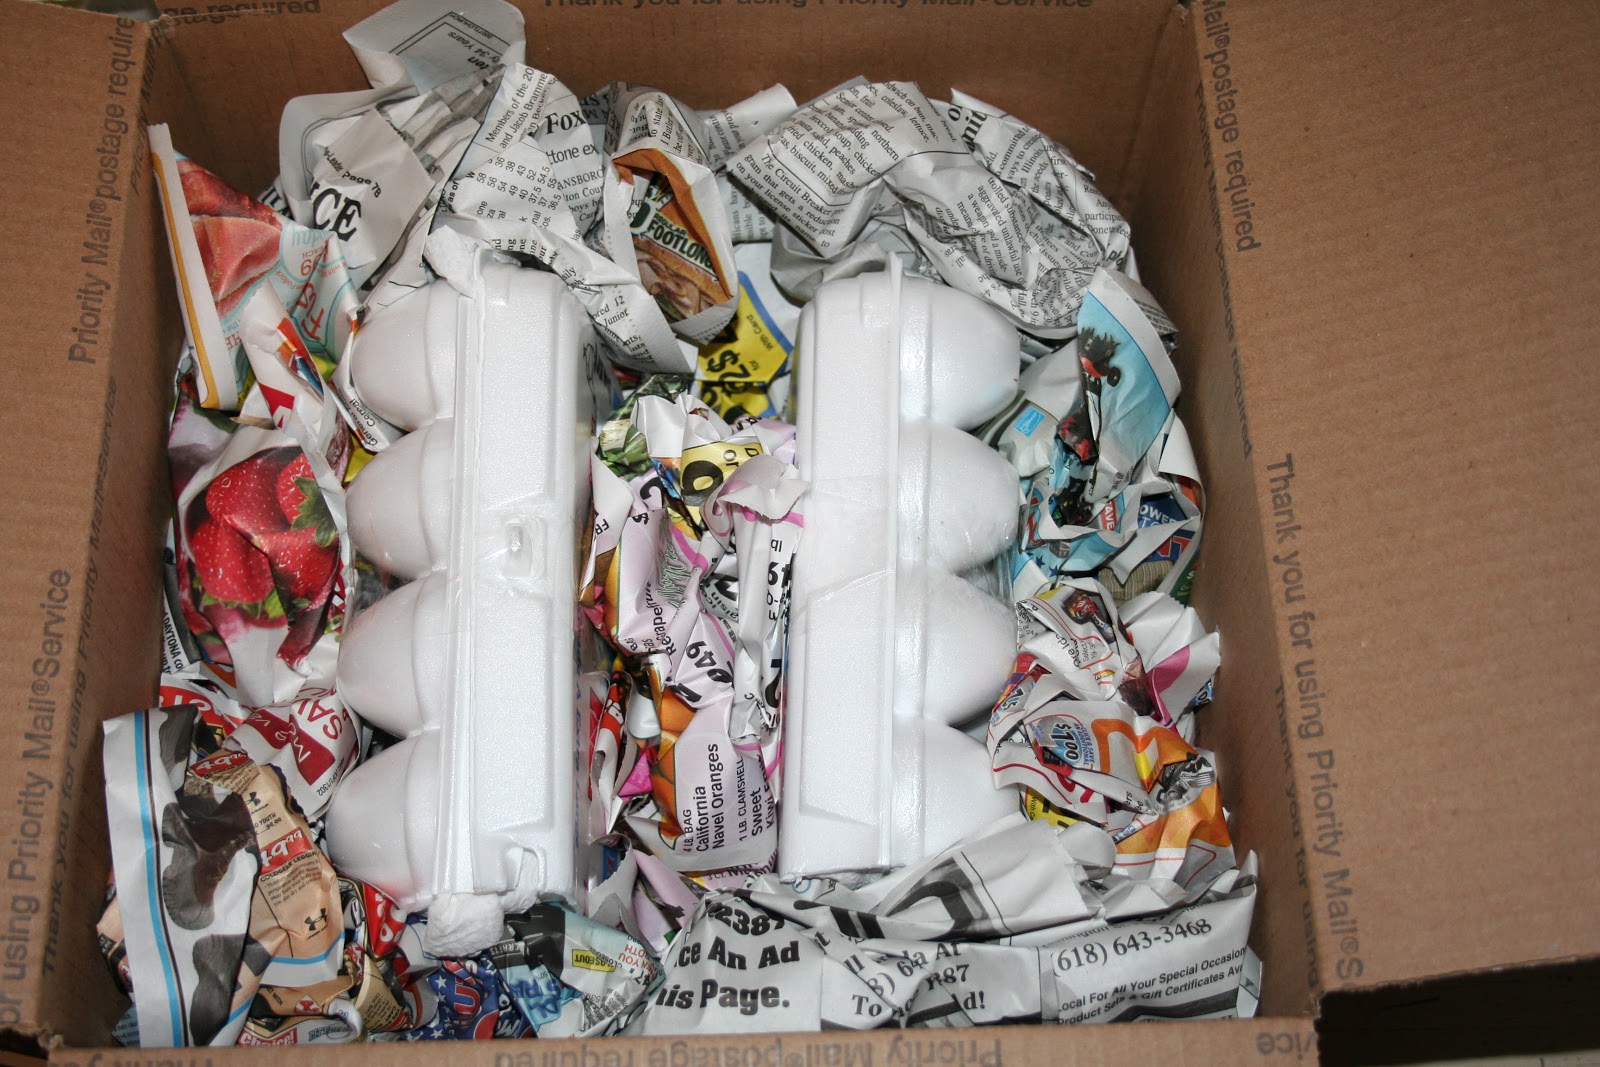

A layer of crumpled news paper is then added to the top of the box. Now the hatching eggs have no wiggle room. I then tape the box shut.

The boxes are then marked Fragile on all sides. Not that this always matters to the Postal Service but I do try to make it visible. I never mark the box Hatching Eggs I use to do that but we ended up with smashed boxes more often. The hatching eggs are shipped priority mail it proves to be just as fast as express mail these days. When you get your hatching eggs never let them rest for 24 hours like you might read on the Internet. This is a bunch of Bologna your eggs can rest in your incubator.
We aren't selling hatching eggs at this time but hope to offer them again later in the summer. We need every egg at this time to fill our chick orders.
Monday, April 8, 2013
Good Morning!
Good Morning! My name is Melissa and I am joining my Aunt Angie here on the Chicken Scratch Blog from time to time. I look forward to sharing about daily life in our home, new recipes, and of course all things sewing!
A little about myself… I am a born again believer in Jesus Christ, wife to a wonderful husband, and stay-at-home mommy to 3 young girls (ages 1,2,4). Getting to stay at home with my girls is without a doubt one of my life’s greatest blessings. It is both exciting and exhausting all at the same time! There is never a dull moment in our home.

Some days it feels as if I am only surviving until naptime. Once my girls are peacefully resting, I pull out my sewing machine and go to work. I LOVE to sew! It has become a welcome departure from the everyday duties of being a wife and mama.
If I am not sewing during naps then I like to bake bread and try new recipes. Today I’ll share one of my family’s recent favorites. These croissants are the perfect addition to any meal. When rolling the croissants up add ham and cheese then it becomes a great hot sandwich. The possibilities are endless!
Sweet and Buttery Croissants:
Ingredients:
2c warm water
2/3 c nonfat dry milk powder
2/3 c nonfat dry milk powder
2 TBS dry yeast
¼ c sugar
2 tsp of salt
1/2 cup butter melted
2 tsp of salt
1/2 cup butter melted
1 egg (a beautiful brown Chicken Scratch egg)
4 ½ - 5 cups all purpose flour

Directions:
In a mixing bowl (I use my kitchen aide mixer, if you don’t have one this will require a little more work. It is a soft dough so it should still come together pretty easily.) Stir in warm water and nonfat dry milk until it dissolves. Then add yeast, sugar, salt, melted butter, egg and 2 cups of flour. Mix on low speed until all these ingredients are combined. Add 2 more cups of flour and mix on a med speed until stirred in. Then continue adding ½ cup of flour at a time until dough is soft, but not too sticky. Scrap down the sides of the bowl and then add about 1 TBS of vegetable oil. Rub it around the sides of the bowl so that as the dough grows it won’t stick to the inside. Cover with plastic wrap. Allow the dough to rise in a warm place until the it has doubled in size. This takes about 45 min to 1 hour.
Once the dough has risen divide it in half and roll it out on a flat floured surface like seen here.

Using a pizza cutter slice the dough into halves then quarters and so on.

Then roll the dough into a croissant starting at the wide end. Place then on a baking sheet or a stone.

Allow them to rise a second time about 1 hour or until they have double in size. Bake them at 375 F for 15-20 min or until they look golden brown. Enjoy your warm croissant with a nice swipe of real butter!

I love it when my girls wake up from their naps, their noses tell them that mommy is making something good in the kitchen. These croissants never disappoint!
Give them a try and then comment and let us know what you think!
Until next time,
Melissa
** I also love this recipe because when you divide your dough and roll the croissants there are 2 batches. 1 batch makes 16 croissants. More than enough for my family! I take the second batch and stick them in the freezer on a baking sheet BEFORE they rise the second time. After they are frozen I throw them in a ziplock bag and have croissants for another meal and all I have to do is let them thaw and rise.
Friday, April 5, 2013
The First Chick Shipment For This Spring

Tuesday was our very first chick shipment for this season. We hatch on Monday nights and ship on Tuesday mornings. Chick shipping day is always a busy, hectic, run myself crazy day. The first thing I do to get ready is mix up the grow gel. Each box gets 2 little cups hot glued in the corners to hold the grow gel. The chicks eat this along the way and it keeps them hydrated during shipment. Grow gel is mixed with water.

The end product looks like green jell-o salad and the chicks seem to love it. I was afraid when I first began to use it. I wasn't sure if the chicks could find it in the box. After asking customers what they see, it seems the chicks find it just fine and eat it all. Most hatcheries charge for grow gel, we don't, I think it's just worth it to put it in the box and have healthy chicks arrive at their new home.


Each box gets a heat pack in the bottom of the box under the grassy pad.


Monday, April 1, 2013
Spring Time Goodies

I love spring and all it has to offer one of my favorites is fresh strawberries. For Easter I made fresh strawberry pies and they were quite a hit with the family. They don't take long to make and it's very easy. First I start by making the pie crust.

My recipe makes 2 pie crust
2 cups flour
1 tsp salt
2/3 cup shortening
5 to 7 Tbs cold water
Mix dry ingredients together in a bowl, add shortening and water. Cut shortening into flour with a pastry cutter or you can just use your hands. I use a pastry cutter until I get it mixed pretty well then I just use my hands. Once you get it mixed well form into 2 equal sized balls.

Now your ready to roll out your pie crust. put down a dusting of flour and roll out the crust to fit the size of your pie dish. Once you've rolled out the crust lay it over your dish and cut off the excess dough. This is the dough as a child my sisters and I always waited for and fought over while my mom made a pie. To keep us three girls out of the dough my mother always told us "Don't eat that, it'll give you worms!" I always hated the thought of getting worms, but it is worth the risk. 
I don't make the prettiest pie crust but it sure is better than store bought. Now you need to prick the bottom of the crust with a fork and bake at 350 degrees for about 10 to 12 mins.

Wash strawberries, remove stems and any bad spots.

Cut Strawberries and place in cooled pie crust.

Ingredents for pie gel
1 cup white sugar
2 Tbs cornstarch
1 cup water
1 (3 ounce) package strawberry flavored jell-o
In a sauce pan mix sugar water and cornstarch, cook over med. heat until mixture thickens. Remove from heat. Add gelatin and stir until smooth. Let mixture cool to room temp.

Cool gel to room temp and pour over strawberries.

Refrigerate until set. Serve with whipped cream and enjoy!
Subscribe to:
Comments (Atom)